CocosCreator2.1.0版本正式支持导入3D模型
对于2.5D游戏的开发来说有着重要意义
自己此前在写捕鱼游戏时了解过自定义shader
并实现了4种不同的水波效果
但经过CocosCreator版本的不断升级
尤其是1.10和2.0两个版本
旧的渲染器被抛弃了
因此老的shader特效也全都不能用了
直到最近正好有时间,花了几天把原先写的特效升级到了最新的2.1.0版本
下面记录一下自定义shader实现方法的改变
以及新的渲染器的理解
过往自定义shader的实现依赖
cc.gl
cc.GLProgram
cc.GLProgramState
CCSprite._sgNode
CCTexture2D.setTexParameters
这些统统都不能用了!
取而代之的是新的渲染结构
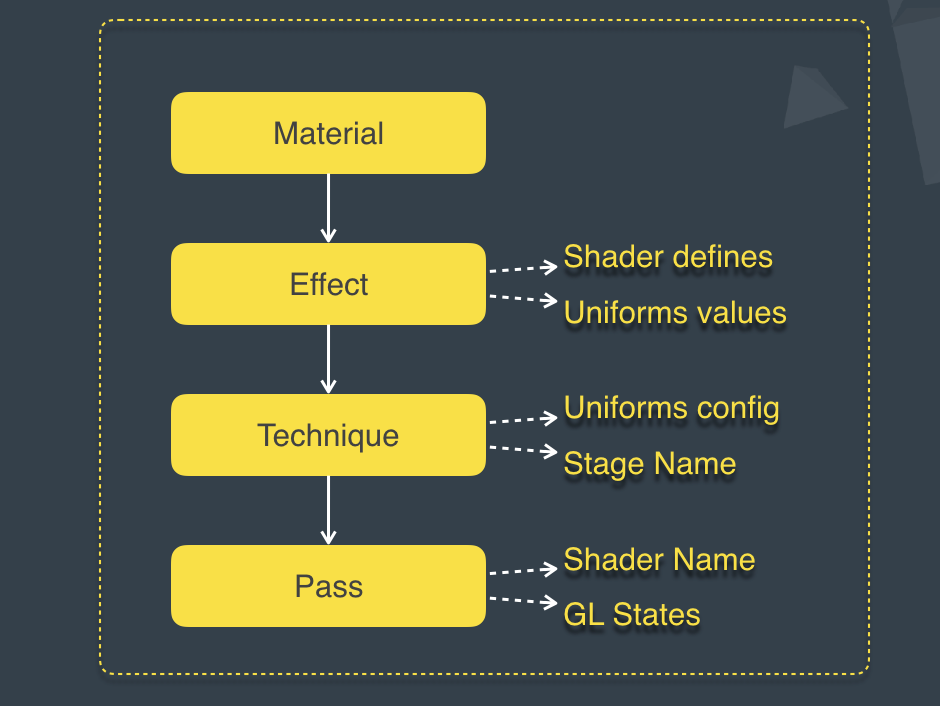
显然又是多层封装咯
最上层的material关联到sprite组件
最底层的pass关联到具体的vert和frag着色器代码,也就是Shader层
其实Shader层才应该是最底层的
从底向上一层层来看
Shader
系统默认的shader是通过以下方法保存在lib对象中的
而lib对象所在的位置比较奇怪,可能往后的版本会变更
cc.renderer._forward._programLib
着色器代码也需要稍作修改
以往的CC_Texture0等固定变量都不存在了
Pass
Pass的构造函数传入的name就是与着色器同名的name
所以Pass是直接关联shader的
另外Pass还包含了混合参数、深度测试参数、模板测试参数等等
Base.prototype._draw = function _draw (item) { var this$1 = this; var device = this._device; var programLib = this._programLib; var node = item.node; var ia = item.ia; var effect = item.effect; var technique = item.technique; var defines = item.defines; // reset the pool // NOTE: we can use drawCounter optimize this // TODO: should be configurable _float2_pool.reset(); _float3_pool.reset(); _float4_pool.reset(); _float9_pool.reset(); _float16_pool.reset(); _float64_pool.reset(); _int2_pool.reset(); _int3_pool.reset(); _int4_pool.reset(); _int64_pool.reset(); // set common uniforms // TODO: try commit this depends on effect // { node.getWorldMatrix(_m4_tmp$2); device.setUniform('model', mat4.array(_float16_pool.add(), _m4_tmp$2)); var inverse = mat3.invert(_m3_tmp$1, mat3.fromMat4(_m3_tmp$1, _m4_tmp$2)); if (inverse) { mat3.transpose(_m3_tmp$1, inverse); device.setUniform('normalMatrix', mat3.array(_float9_pool.add(), _m3_tmp$1)); } // } // set technique uniforms for (var i = 0; i < technique._parameters.length; ++i) { // 这里遍历technique._parameters // 再从effect找到参数的值 // 因此参数必须在technique中声明并同时在effect中定义 // 若不在technique中声明,则不会遍历不会走到device.setUniform这一步 var prop = technique._parameters[i]; var param = effect.getProperty(prop.name); // 若未在effect中赋值,则从technique中找默认 if (param === undefined) { param = prop.val; } // 默认也找不到,就给个该类型的default值 if (param === undefined) { param = this$1._type2defaultValue[prop.type]; } if (param === undefined) { console.warn(("Failed to set technique property " + (prop.name) + ", value not found.")); continue; } if ( prop.type === enums.PARAM_TEXTURE_2D || prop.type === enums.PARAM_TEXTURE_CUBE ) { if (prop.size !== undefined) { if (prop.size !== param.length) { console.error(("The length of texture array (" + (param.length) + ") is not corrent(expect " + (prop.size) + ").")); continue; } var slots = _int64_pool.add(); for (var index = 0; index < param.length; ++index) { slots[index] = this$1._allocTextuerUnit(); } device.setTextureArray(prop.name, param, slots); } else { device.setTexture(prop.name, param, this$1._allocTextuerUnit()); } } else { var convertedValue = (void 0); if (param instanceof Float32Array || param instanceof Int32Array) { convertedValue = param; } else if (prop.size !== undefined) { var convertArray = _type2uniformArrayValue[prop.type]; if (convertArray.func === undefined) { console.error('Uniform array of color3/int3/float3/mat3 can not be supportted!'); continue; } if (prop.size * convertArray.size > 64) { console.error('Uniform array is too long!'); continue; } convertedValue = convertArray.func(param); } else { var convertFn = _type2uniformValue[prop.type]; convertedValue = convertFn(param); } device.setUniform(prop.name, convertedValue); } } // for each pass for (var i$1 = 0; i$1 < technique._passes.length; ++i$1) { var pass = technique._passes[i$1]; var count = ia.getPrimitiveCount(); // set vertex buffer device.setVertexBuffer(0, ia._vertexBuffer); // set index buffer if (ia._indexBuffer) { device.setIndexBuffer(ia._indexBuffer); } // set primitive type device.setPrimitiveType(ia._primitiveType); // set program (通过pass里保存的program名字找到着色器program!) var program = programLib.getProgram(pass._programName, defines); device.setProgram(program); // cull mode device.setCullMode(pass._cullMode); // blend if (pass._blend) { device.enableBlend(); device.setBlendFuncSep( pass._blendSrc, pass._blendDst, pass._blendSrcAlpha, pass._blendDstAlpha ); device.setBlendEqSep( pass._blendEq, pass._blendAlphaEq ); device.setBlendColor32(pass._blendColor); } // depth test & write if (pass._depthTest) { device.enableDepthTest(); device.setDepthFunc(pass._depthFunc); } if (pass._depthWrite) { device.enableDepthWrite(); } // stencil if (pass._stencilTest) { device.enableStencilTest(); // front device.setStencilFuncFront( pass._stencilFuncFront, pass._stencilRefFront, pass._stencilMaskFront ); device.setStencilOpFront( pass._stencilFailOpFront, pass._stencilZFailOpFront, pass._stencilZPassOpFront, pass._stencilWriteMaskFront ); // back device.setStencilFuncBack( pass._stencilFuncBack, pass._stencilRefBack, pass._stencilMaskBack ); device.setStencilOpBack( pass._stencilFailOpBack, pass._stencilZFailOpBack, pass._stencilZPassOpBack, pass._stencilWriteMaskBack ); } // draw pass device.draw(ia._start, count); this$1._resetTextuerUnit(); }};
Technique
Technique的构造函数如下
var Technique = function Technique(stages, parameters, passes, layer) {
stages不太了解
parameters声明了注入shader代码中的参数名和类型
未声明的参数即使写在shader里面也是无法使用的
passes可以指定多个,是否意味着多次渲染
以下是默认的SpriteMaterial中的Technique
var mainTech = new renderer.Technique( ['transparent'], [ { name: 'texture', type: renderer.PARAM_TEXTURE_2D }, { name: 'color', type: renderer.PARAM_COLOR4 } ], [ pass ]); 可以看到只设置了两个参数
因此在着色器中可以使用texture纹理采样
同时使用节点颜色color
Effect
Effect的构造函数如下
var Effect = function Effect(techniques, properties, defines) {
以下是默认的SpriteMaterial中的Effect
this._effect = new renderer.Effect( [ mainTech ], { 'color': this._color }, [ { name: 'useTexture', value: true }, { name: 'useModel', value: false }, { name: 'alphaTest', value: false }, { name: 'useColor', value: true } ]); 在自定义材质中properties直接传空对象{}即可
如果是不变的uniform参数可以在technique中赋值默认val
如果是变化的uniform参数,如time、衰减因子、点击位置等等
通过以下方法来更新变量的值即可
Effect.prototype.setProperty = function setProperty (name, value) {
Material
自定义材质可以继承自默认材质
也可以类比SpriteMaterial来写
但我觉得那样太麻烦了,直接继承Material把几个有用的参数填进去就行了
而材质与sprite的绑定也简化为两行代码
原本CCSprite._activateMaterial统统省去
当纹理和顶点信息不改变的情况下
我认为以下两句是可以省略的
this.markForUpdateRenderData(true);
this.markForRender(true);
class CustomMaterial extends cc.renderer.renderEngine.Material{ constructor(name , vert , frag , uniforms = [] , defines = []){ super(false); this.name = name let lib = cc.renderer._forward._programLib; !lib._templates[name] && lib.define(name, vert, frag, defines); this.init(name , uniforms); } use(sprite){ // cc.dynamicAtlasManager.enabled = false; // 设置基本纹理和颜色 let texture = sprite.spriteFrame.getTexture(); let color = sprite.node.color this.setTexture(texture); this.setUniform('color' , { r: color.r / 255, g: color.g / 255, b: color.b / 255, a: sprite.node.opacity / 255 }) this.updateHash(); // 指定sprite的材质 sprite._material = this; sprite._renderData._material = this; sprite._state = cc.Sprite.State.CUSTOM; } init(name , uniforms) { let renderer = cc.renderer.renderEngine.renderer; let gfx = cc.renderer.renderEngine.gfx; let pass = new renderer.Pass(name); pass.setDepth(false, false); pass.setCullMode(gfx.CULL_NONE); pass.setBlend( gfx.BLEND_FUNC_ADD, gfx.BLEND_SRC_ALPHA, gfx.BLEND_ONE_MINUS_SRC_ALPHA, gfx.BLEND_FUNC_ADD, gfx.BLEND_SRC_ALPHA, gfx.BLEND_ONE_MINUS_SRC_ALPHA ); let mainTech = new renderer.Technique( ['transparent'], [ ...uniforms, { name: 'texture', type: renderer.PARAM_TEXTURE_2D /*, val : '默认值'*/}, { name: 'color', type: renderer.PARAM_COLOR4 /*, val : '默认值'*/}, ], [pass] ); this._texture = null; this._effect = this.effect = new renderer.Effect([mainTech], {}, []); this._mainTech = mainTech; }};
Render
可渲染节点如包含CCSprite组件的node
渲染组件CCSprite继承自RenderComponent
渲染组件onEnable时会为node赋值渲染组件的索引
this.node._renderComponent = this;
CCDirector.mainLoop中发起渲染命令
RenderComponentWalker.visit遍历场景节点
RenderFlow._children方法中会过滤点!active和全透明的节点
if (!c._activeInHierarchy || c._opacity === 0) continue;
RenderComponentWalker._commitComp中比较material的hash值
这也是updateHash的意义所在(若不调用updateHash很可能会报错,比如当节点是首个渲染节点时)
若hash值相同会使用上一个材质(流水线操作)
_commitComp (comp, assembler, cullingMask) { if (this.material._hash !== comp._material._hash || this.cullingMask !== cullingMask) { this._flush(); this.node = assembler.useModel ? comp.node : this._dummyNode; this.material = comp._material; this.cullingMask = cullingMask; } assembler.fillBuffers(comp, this); }, RenderComponentWalker._flush
Scene.prototype.addModel添加至渲染模型数组
Base.prototype._render会遍历模型数组
显然model中是包含material等全部渲染信息的
再由Base.prototype._draw渲染每一个显示模型
最后由Device.prototype.draw调用opengl命令完成绘制~
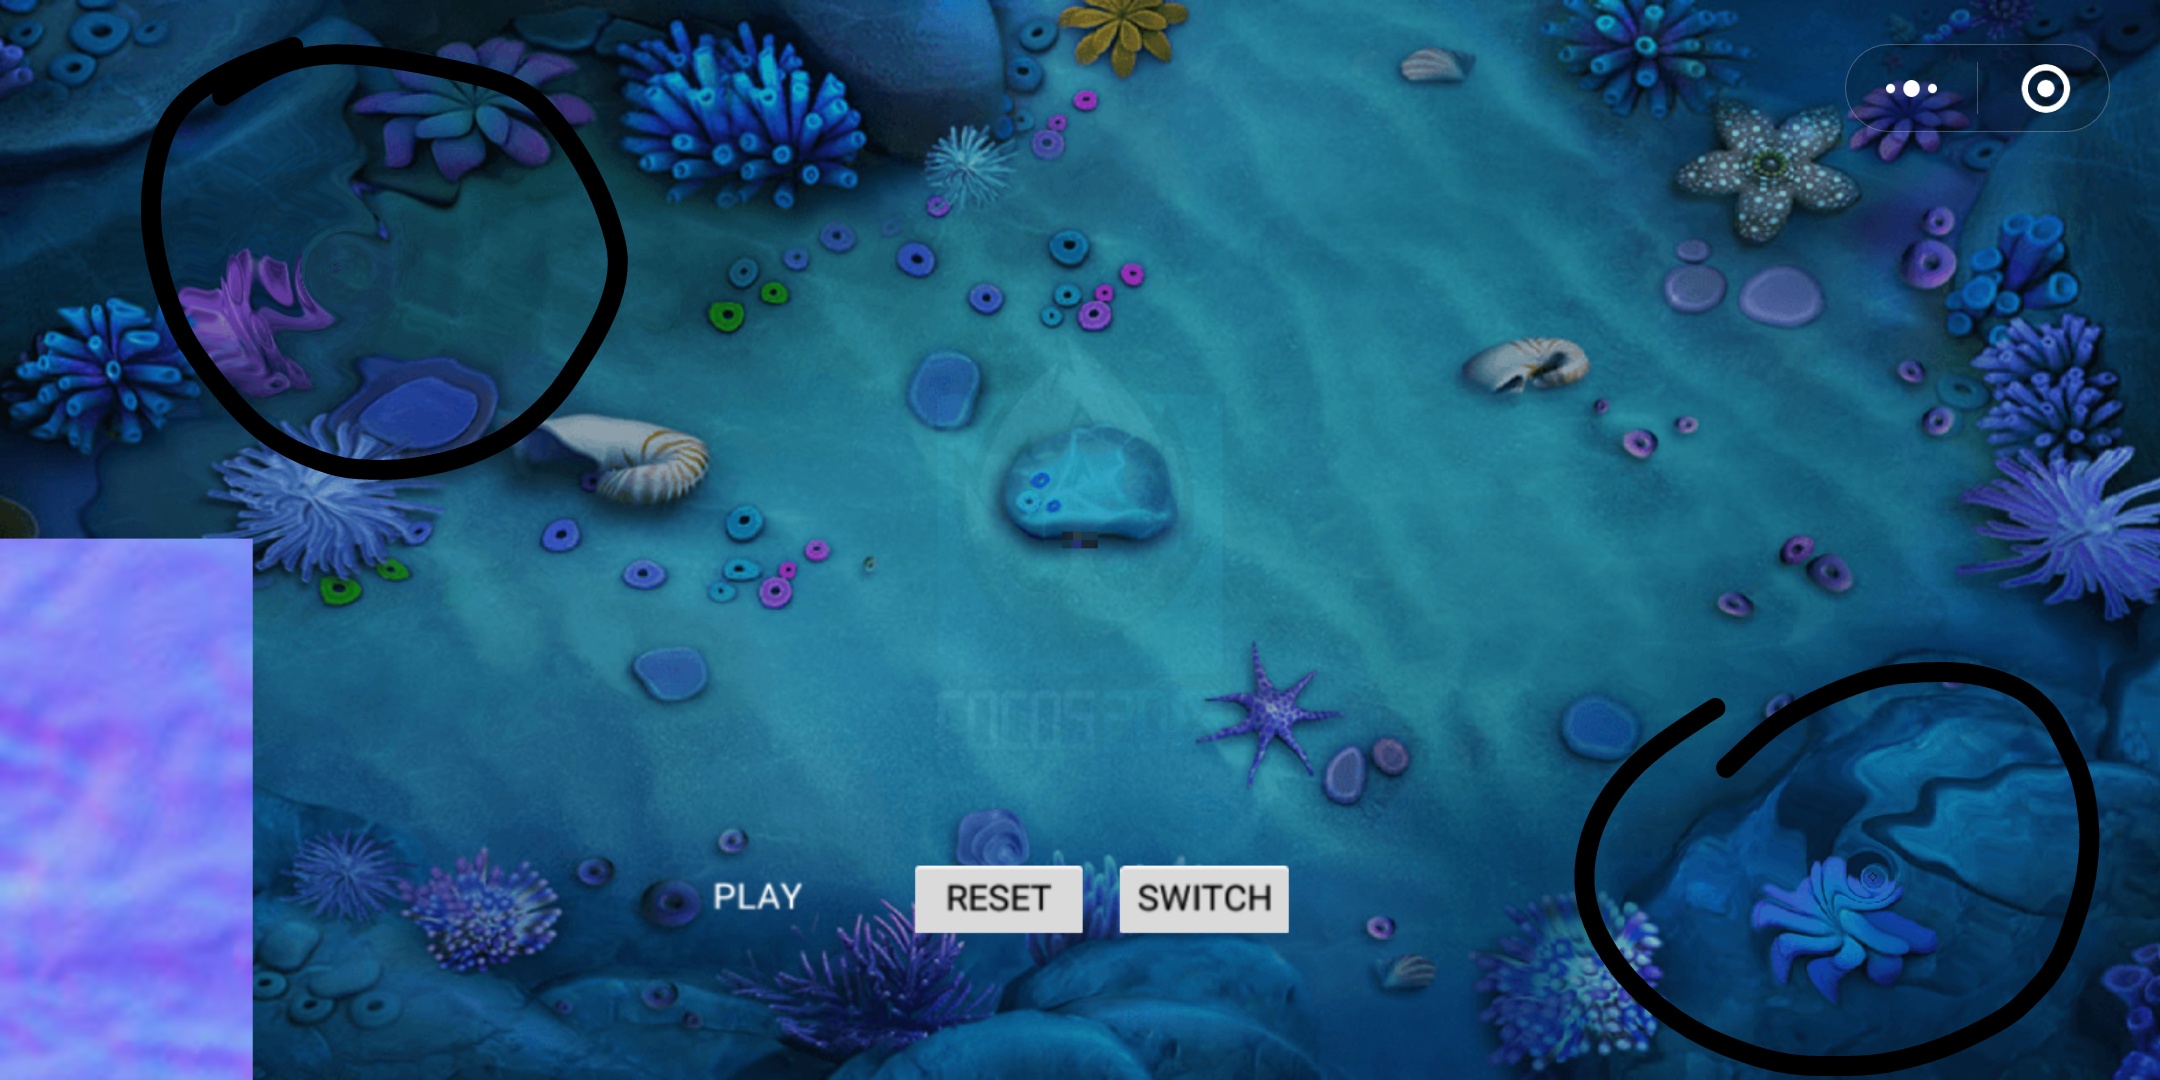
贴一张微信小游戏的水波点击效果图(H5、安卓原生效果一致)
参考文献
https://forum.cocos.com/t/cocos-creator-2-x-shader/69098